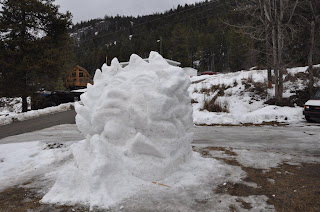
About three weeks later the more snow never came, then one fine day I just started,
I figured otherwise all my work would have just melted away. In second image I have roughed in the general shape of my design and pushed some markers in as reference points for scale. As I said before the longer it sits before you carve it the harder and more ice it has. Here, it was warm during the day ( +3 to 5C ) and then coldish at night (-5 to -10 ) so there were ice and air pockets created by the buried grass and leaf debris heating up melting the snow during the day and freezing at night. In colder climates you don’t have the same problems with the ice but I had the right sculpting tools so it wasn’t to much of a problem. From here you just carve and sculpt your piece ( if you need to do repairs keep a couple 5gallon pails full of snow warming up so when you need it you can just grab a handful and use it kind of like glue/mortar but only when its below zero). I’m going to assume you already know a bit about creating art so I’m not going to go on about it other than to say that I just used pieces of kindling for markers.
 Airbrushing murals leaves me a good selection of ladder type apparatus to choose from so I went with a two step bench, a ten foot step and a three bend scaffold ladder. Working in snow I found was a little like sand sculpture in that you can do allot as long as you keep physical weight and balance in mind all the time. It sticks to itself well but its not like clay.
 In this 3rd photo I have spent a little more time working in the character of the face, using the markers again for scale. The scaffold you can see in the left corner I stood on to look at my work so I didn’t have to move a ladder every time I wanted to check my work. I had started out just using a pruning saw and shovel but as I have sculpted allot of plastelene I am used to certain tools, the characteristics, shapes and what you can do with them so I gave up on the shovels and kitchen utensils (their just to small). In a pinch they would work alright but if I were going to do this a few times every winter I felt it was worth the trouble and money to get some tools for doing this. So after a good look here on the net, I found nothing. Looking around the shop I found some steel and just made some of my own. A little cutting, a weld here a bend there, a bit of grinding and an hour or so of polishing the long day was over and I had come up with some handy tools. If you are interested in a set of large scale sculpting tools send me an email ( t@art-werks.net ), having the right tools made the whole process allot easier and faster.
This fourth photo shows a still rough sculpture (the head still needs some shaping) and how little snow there was.
These two photo’s above show the finishing touches being applied or rather removed. As I said before, I didn’t have all the snow I had wanted so this sculpture only sort of looks like where I was going with it. Notice the snow pile on the right, its the one I did in part 1.
In the end this was as far as I could go without more snow as I had wanted big wild blowing hair. Let me know what you think by leaving a comment.
These photo's and article are the intellectual and copyrighted property of Timothy Arnell all rights are reserved and may not be used in whole or in part without permission. copyright 2010 Timothy Arnell.


